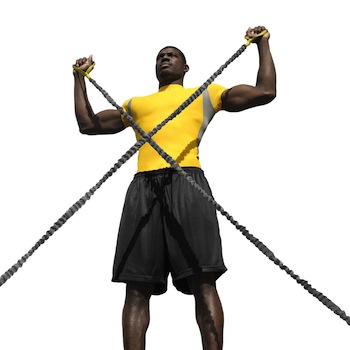
So you have been rocking your baseball off-season training program, but your calendar just filled up with other commitments later this week and you are not sure how you are going to get your 3rd training session in.
Break out your TRX Suspension Trainer and you can get your training done effectively and efficiently.
With its portability and versatility, you can incorporate a multitude of bodyweight exercises and perform them one after the other so you can challenge your strength and your cardiovascular conditioning at the same time. But let’s not get too detailed on the piece of equipment itself (you can do that here).
Let’s get right down to the sample TRX baseball workout so you can make the most of your busy schedule.
Sample TRX Baseball Workout
If you have the time, make sure you start with some soft tissue work that includes a foam roller or the tools in this Trigger Point Starter Set. Here’s what you need to hit.
Glutes – 1 x 60 seconds each side
IT Band – 1 x 60 seconds each side
Quads – 1 x 60 seconds each side
Groin – 1 x 60 seconds each side
Hip Flexor/TFL – 1 x 60 seconds each side
Mid/Upper Back – 1 x 60 seconds each side
Next, make sure you get your dynamic warm-up in. You don’t need any equipment for this, but to make it fun, we’ll use the TRX for some of the following movements to get your heart rate up and your muscles prepared for the tougher TRX movements.
Complete the following movements one after the other with minimal rest. Complete the cycle 2-3 times.
TRX Basic Squat – 15 reps
Reverse Lunge and Twist in place – 5 reps each side
TRX Row – 15 reps
World’s Greatest Stretch in place – 5 reps each side
Reverse Inch Worms – 5 reps
TRX Lateral Lunge – 5 reps each side
Okay, now for the meat of the training – your time efficient TRX baseball workout. We are going to create two separate circuits of 4 exercises. After each set, rest for 1 minute and then repeat the circuit. When you have completed all sets on the first circuit, move to the second circuit.
Depending on your time restraints, shoot for 2-3 sets of each circuit.
Circuit One
TRX Squat Jump x 10
TRX Push-up x 10
TRX 1-leg Lunge x 10 each
TRX W’s x 10
Circuit Two
TRX 1-leg Squat x 8 each leg
TRX Torso Rotation x 10 each side
TRX T’s x 12
TRX Body Saw x 12
Again, if you have the time, make sure you finish up with some quality soft tissue work. If you perform your soft tissue work directly after the above circuits, then reserve some time later in the day or before you go to bed to roll out any tightness or knots you may have. Hop on that foam roller and get after it.
Glutes – 1 x 60 seconds each side
IT Band – 1 x 60 seconds each side
Quads – 1 x 60 seconds each side
Groin – 1 x 60 seconds each side
Hip Flexor/TFL – 1 x 60 seconds each side
Mid/Upper Back – 1 x 60 seconds each side
Get Back to Basics in Your Next Training Session
Remember, this is a fill-in workout because you are pressed for time. Do not make this a staple of every training session. You need to make sure you are still including medicine ball work, deadlifts, squats, and baseball-specific conditioning on a regular basis. Incorporate this TRX baseball workout when you truly do not have the time to complete your programmed training.
Throwing a baseball takes more than just your arm. It requires the coordination of your legs, hips, abdominals, back, and shoulder in order to throw a ball with accuracy and power. However, with all of those forces working together, it is often the shoulder that sees a majority of the stress as a result.
The shoulder is one of the most mobile joints in the human body. This mobility also leads to it being one of the most unstable joints as well. Instability opens the door to a list of potential injuries whether you are an overhead athlete (i.e. baseball player) or not an athlete at all. Throwing a baseball places a large, repetitive amount of stress on the already unstable shoulder. So, what can you do to make sure you are protecting your arm from injury? In order for you to get a better understanding of the shoulder, let’s take a quick look at its anatomy.
Anatomy and Function
The Joints
The shoulder girdle is made up of the humerus (upper arm), the scapula (shoulder blade), and the clavicle (collar bone.) These three bones form two separate joints: the glenohumeral joint and the acromioclavicular joint.
Though the glenohumeral joint is a ball and socket joint, it is unlike the hip in that the humerus does not sit in a true socket like the femur does in the hip. Instead, the glenoid fossa of the scapula acts as a small cup that the humeral head rests against. Think of a baseball sitting on a batting tee. This particular feature of the shoulder is what allows it to be so mobile in order to move in all of its different directions. In fact, it is so mobile that the head of the humerus can actually move up to one inch out of the glenoid cavity during normal movement — even more when throwing a baseball.
Rotator Cuff
Now, you cannot talk about the shoulder without discussing the rotator cuff. As a baseball player, you have probably heard that term more times than you can count. I bet you’ve heard it so many times, that you begin to drown out your coaches and trainers when they begin to discuss its importance. As a ballplayer, it would do you good to understand exactly what the rotator cuff is and how it functions, especially when it comes to throwing a baseball.
The rotator cuff is a set of 4 muscles that pulls the head of the humerus into the scapula to provide stability to the glenohumeral joint. Not only do they help to stabilize the shoulder joint, but each of those muscles functions in a manner so as to allow you to raise or rotate your arm as well.
The Scapula (shoulder blade)
Glenohumeral mobility can only occur with a stable scapula. And stability and normal range of motion are dependent upon the surrounding musculature. The main stabilizers of the scapula are the levator scapulae, rhomboids, serratus anterior, and trapezius. Along with the rotator cuff, these muscles help to anchor and guide movement of the shoulder blade.
Throwing and Shoulder Injuries
As you can see, the rotator cuff and other scapula stabilizers play a pivotal role in the throwing process. The shoulder’s surrounding tissues are looking to stabilize the shoulder as best as possible when the environment and conditions (i.e. throwing a baseball) call for being unstable in order to perform the task. But instability can result in injury. It’s a delicate balance.
During a throw, the shoulder moves through four phases:
Cocking Phase (external rotation)
Acceleration Phase (internal rotation)
Deceleration Phase
Follow Through
Internal rotation of the humerus during throwing can reach velocities of 6,100-9,000º/sec and is followed by eccentric deceleration of the posterior rotator cuff.(1) Because shoulder forces, torques, and muscle activity are greatest during the arm cocking and deceleration phase, it is believed that most shoulder injuries occur during these phases.
As you just learned, the rotator cuff helps keep the shoulder stable during these high forces. In fact, the rotator cuff activity has to be so high that it can resist the high shoulder distractive forces that can be between 80-120% of the thrower’s bodyweight during the arm cocking and deceleration phases.(2)
At such high forces, repetitive small microtraumas can occur in the shoulder muscles, capsule, and ligaments resulting in impingement. In addition, a baseball player’s shoulder can become fatigued or strained by throwing too much, throwing incorrectly, or not getting enough rest. Fatigue, strain, or impingement can result in the rotator cuff being unable to perform its job making the entire shoulder more prone to injury.
An overworked rotator cuff is a weak and possibly painful rotator cuff, and therefore is less effective in stabilizing the shoulder. While a ballplayer may not recognize any symptoms initially, over time he can place his shoulder in a cycle of inflammation and weakness which may eventually lead to pain. If you want to be successful and keep yourself healthy, you need to take a proactive approach in the maintenance of your shoulder. The best way to do this is to incorporate a sound strength and conditioning program and pair it with a quality throwing program.
Strengthening the Shoulder
Now that we know a little anatomy about the shoulder and how vulnerable it can be, let’s discuss what you can do to strengthen it. Obviously, a quality strength and conditioning program will be vital to the success of any ballplayer, but what can you specifically do to protect your shoulder from injury or keep it from breaking down throughout the season? For the purposes of this article, let’s keep it simple by discussing the use of resistance tubing as a strengthening tool.
Resistance Tubing
The implementation of resistance tubing exercises has played a huge role in the rehabilitation of injured shoulders as well as the strengthening and longevity of healthy ones.
While many college and professional athletes and coaches know the benefits of resistance tubing, many high school and youth ballplayers, their parents, and their coaches do not utilize resistance bands as part of a healthy arm care program.
Resistance tubing exercises have shown a huge benefit in baseball players (and all overhead athletes for that matter) by “improving strength, proprioception, muscle performance characteristics, athletic performance, and injury prevention.”(3) Knowing these benefits makes it a no-brainer to include resistance tubing in your shoulder strengthening and throwing program.
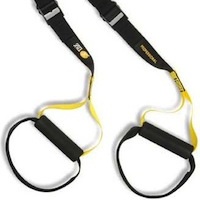
Crossover Symmetry
One of the biggest proponents of resistance tubing exercises is Duggan Moran, creator of the Crossover Symmetry system. With Crossover Symmetry, baseball players can perform a series of exercises in a variety of settings.
On the field as a warm-up for practice or game prior to picking up a baseball.
In a weight room setting as part of your strength and conditioning program.
As part of a physical therapy program designed to rehabilitate a shoulder injury.
Incorporation with a long toss program.
With Crossover Symmetry, the cords are crossed in order to provide a better angle of resistance and range of motion. Using two cords allows the ballplayer to use both his dominant (throwing arm) and non-dominant sides to create balance across the back and scapular stabilizers.
Often times with resistance band programs, players and coaches are often left wondering what exercises to perform. Crossover Symmetry takes out the guesswork by providing a structured program outlined right next to the band setup. The exercise chart has step-by-step illustrations with specific exercises listed in a specific order and shows the athlete which resistance to use and the number of reps for each exercise.
Here’s a short demonstration of the system which allows you to see the entire setup right at the ball field. Video/sound quality isn’t the best, but you can get an idea of what Crossover Symmetry is all about.
As a baseball player, your arm is your lifeline. If you cannot throw, you cannot play. You need to keep it strong and stable by taking action and developing a shoulder strengthening program for injury prevention and performance enhancement. Crossover Symmetry can help you achieve both. It is a phenomenal piece of equipment and one that you should strongly consider putting in your baseball bag.
References
1. Ellenbecker TS, Mattalino AJ. Concentric Isokinetic Shoulder Internal and External Rotation Strength in Professional Baseball Pitchers. Journal of Orthopaedic & Sports Physical Therapy. 1997;25(3):323-328.
2. Escamilla RF, Andrews JR. Shoulder muscle recruitment patterns and related biomechanics during upper extremity sports. Sports Medicine. 2009;39(7):569-90. (abstract)
3. Myers JB, Pasquale MR, Laudner KG, Sell TC, Bradley JP, Lephart SM. On-the-Field Resistance-Tubing Exercises for Throwers: An Electromyographic Analysis. Journal of Athletic Training. 2005;40(1):15-22.
Many athletes are beginning to include more bodyweight training into their strength and conditioning programs. Baseball players are no exception, and the TRX Suspension Trainer is one of the tools baseball players and strength coaches are using to incorporate bodyweight training.
Baseball is a sport that requires strength, mobility, and the ability to rotate powerfully. Baseball players definitely need to lift heavy weights during the off-season, but utilizing a piece of equipment like the TRX can help incorporate bodyweight exercises as well. Some of the TRX movements used by baseball players can also help reduce the risk of injury.
Depending on the time of year (off-season, in-season, pre-season), the type of athlete, or the training program itself, a baseball training program can include various TRX exercises. In some rare cases, baseball players can even perform an entire baseball workout with just the TRX.
Portability
The TRX is lightweight, portable, and easy to set up. It also fits into its own carrying bag, so ballplayers who own one can take it with them anywhere. This gives ballplayers the ability to maximize their training time with full body, efficient workouts wherever they are – in the gym, on the field, or even when on the road for those travel teams, college players, and pro athletes.
Versatility
Whatever level of the game you play, the TRX can adapt for any level of baseball fitness. Baseball players can train in three planes of motion with the TRX, allowing various muscle groups to work together to build muscle strength and core stability – not to mention flexibility and balance.
There are literally hundreds of exercises that can be performed on the TRX. Once younger athletes learn and master the more basic movements, they can try more advanced movements or combine different TRX exercises to create challenging movements that can be included in a baseball training program. For baseball players, the greatest benefit of the TRX comes with incorporating mostly back, core, and posterior chain exercises.
Put a TRX in Your Baseball Bag
Now don’t go thinking that the TRX is the end-all-be-all for baseball strength training. Baseball players still need to lift heavy weights, throw medicine balls, and push sleds. However, the TRX can be effectively included in a well-designed baseball training program. To learn more about the TRX and how it can benefit you, check out the TRX Training website.
 So you have been rocking your baseball off-season training program, but your calendar just filled up with other commitments later this week and you are not sure how you are going to get your 3rd training session in.